Getting Started
This guide will walk you through installing and setting up the Twitcher plugin in your Godot 4 project.
Prerequisites
- Godot Engine: Version 4.6 is required.
- Twitch Account: You need a Twitch account to interact with the API.
- Twitch Application: You'll need to register an application on the Twitch Developer Console to get credentials (Client ID, potentially Client Secret) for OAuth authentication.
Create credentials
- Navigate to the Twitch Developer Console:
- Register a New Application:
- Find the "Applications" section (usually on the left sidebar).
- Click the Register Your Application button (or similar). This will open the application registration form shown in the image.
- Fill in Application Details:
- Name: Enter a unique name for your application (e.g., "My Awesome Godot Game"). This name might be shown to users when they authorize your app.
- OAuth Redirect URLs: (The default Value for Twitcher is http://localhost:7170) This is crucial for the OAuth authorization flow. It's where Twitch sends the user back after they approve or deny your application's request for permissions.
- For local development and authorizing the Godot editor via the Twitcher Setup Wizard, you often use a localhost address.
- Category: Select the category that best describes your application (e.g., "Game Integration," "Chat Bot").
- Choose Client Type:
- Confidential: Select this if your application can securely store the Client Secret. The Client Secret must never be embedded directly in your game client code or distributed application files. (e.g., personal overlays)
- Public: Select this if your application cannot securely store the Client Secret (e.g., most distributed desktop games or overlays, mobile apps).
- Get Your Credentials:
- After creation, Twitch will display your application details.
- Client ID: Your Client ID will be visible immediately. Copy this value.
- Client Secret (if Confidential): You will need to generate a Client Secret. Generate and immediately copy the Client Secret. Treat it like a password – keep it secure and never expose it in your client-side code or repository. You may only be shown the secret once.
- Copy these credentials (Client ID and Client Secret, if applicable) – you will need to enter them into the Twitcher Setup Wizard or your OAuthSetting resource within Godot.
Installation
Download: Download the latest release of Twitcher from the GitHub Releases page. Look for the
addons/twitcherdirectory or a zip file containing it.Copy: Copy the
addons/twitcherfolder into your Godot project's root directory. If you don't have anaddonsfolder, create one. Your project structure should look like this:your_godot_project/ ├── addons/ │ └── twitcher/ │ ├── plugin.cfg │ └── (other plugin files...) ├── project.godot └── (your other scenes, scripts, etc.)Enable Plugin: Open your Godot project, go to
Project->Project Settings->Pluginstab. Find "Twitcher" in the list and check theEnablebox.
Editor Configuration
To get started with Twitcher, you first need to run the Setup. This tool guides you through configuring the essential authentication settings required both for editor tools and your final application.
Launch the Setup:
- Navigate to Project -> Tools -> Twitcher Setup within the Godot editor. (In case you closed the Setup window)
Select Scopes:
- The first step involves selecting the permissions (OAuth scopes) your application needs to interact with the Twitch API.
- There are 2 presets to choose from. Overlay that selects the typical Scopes you need for an overlay like receiving follows, bits, subscriptions, chat etc. The other one is Game that you need for the basic games like chat reading, writing, etc.
- You can change the scopes at any point in time or adjust them like you want. Consult the Twitch API documentation if you're unsure which scopes your specific features require.
- This configures the necessary
OAuthScopesresource for your project.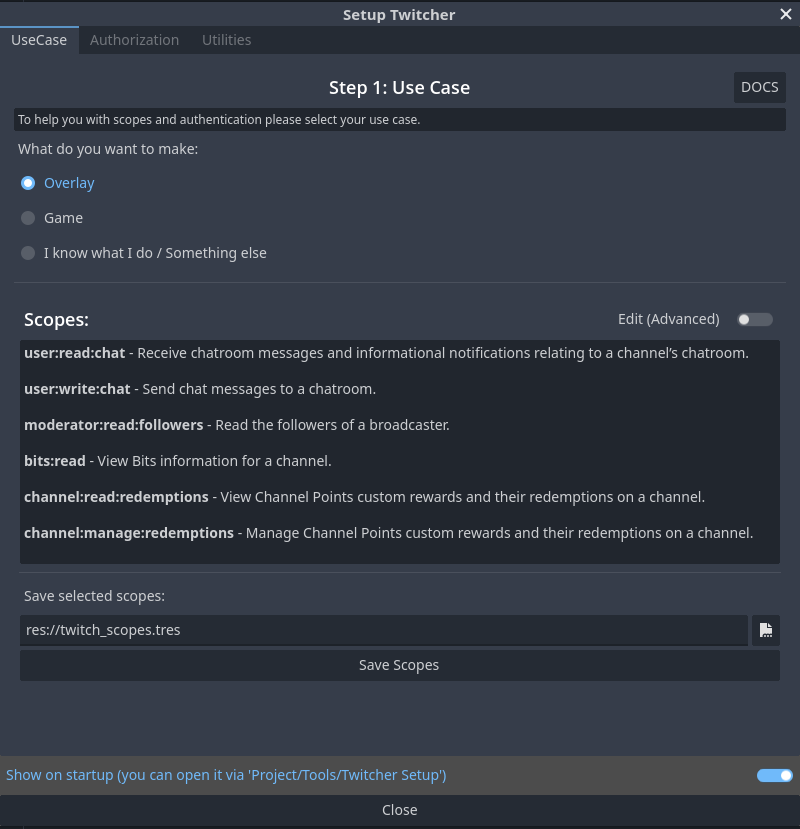 (Select the required permissions (scopes) in the Setup)
Enter Credentials:
- The next step requires you to enter your Twitch Application's credentials.
- Input your Client ID and Client Secret, which you can get from your application settings on the Twitch Developer Console.
- Ensure the Redirect URI shown or entered matches the one configured in your Twitch Developer Console exactly.
- This configures the necessary
OAuthSettingresource. (Enter your Client ID, Client Secret, and Redirect URI)
 - In the end please press the
Test Credentialsbutton to authorize the Godot editor itself. This allows Twitcher's editor tools and integrations (like custom inspectors or resource previews) to function correctly during development by accessing the Twitch API when needed. Follow the browser prompts to grant access.
Completion: Once you complete the setup, Twitcher's core authentication settings (
OAuthScopes,OAuthSettingresources) will be configured, and the editor should be authorized.
Your development environment is now set up! You can begin adding Twitcher nodes (like TwitchService, TwitchChat, etc.) to your scenes and using their features.